Blog

UK log cabins face relentless rain and damp conditions that cause peeling finishes and wood rot when improperly protected. Many homeowners struggle with moisture damage because they skip essential preparation steps or use unsuitable products. This guide provides practical, UK-tailored weatherproofing methods that prepare, treat, protect, and maintain your bespoke cabin for decades of reliable outdoor enjoyment.
Table of Contents
- Prerequisites: Tools And Materials You’ll Need
- Step 1: Prepare And Clean Log Surfaces
- Step 2: Apply Timber Preservative And Sealants
- Step 3: Protect Roof And Install Drainage Systems
- Step 4: Foundation Damp-Proofing And Ground Protection
- Step 5: Regular Maintenance And Inspection
- Common Mistakes And Troubleshooting
- Expected Results And Longevity Benchmarks
- Explore Bespoke Log Cabins And Weatherproofing Solutions
- Frequently Asked Questions
Key Takeaways
| Point | Details |
|---|---|
| Surface preparation prevents failures | Proper cleaning and sanding stop 35% of peeling problems caused by poor adhesion. |
| Breathable stains protect naturally | UK-suitable microporous products allow moisture escape while preserving wood texture and preventing rot. |
| Drainage systems are essential | Roof overhangs and gutters redirect rainwater away from walls and foundations, stopping structural damage. |
| Foundation protection stops rising damp | Damp-proof membranes and proper ground drainage prevent moisture ingress from wet UK soils. |
| Regular maintenance extends lifespan | Inspections and reapplication every 2-3 years can add 15 years to your cabin’s usable life. |
Prerequisites: Tools and Materials You’ll Need
Before starting any weatherproofing project, gathering the right tools and materials ensures smooth application and lasting results. UK conditions demand specific products designed for our wet climate.
You’ll need high-quality microporous wood stains and timber preservatives formulated to breathe while repelling water. These products prevent moisture from becoming trapped inside the wood, which causes rot and decay. Look for items certified for UK outdoor use.
Safety equipment matters when handling chemical treatments. The UK Health and Safety Executive guidelines advise using gloves and respirators when applying timber preservatives due to chemicals that can be hazardous if inhaled or contact skin. Never skip protective gear during application.
For surface preparation, gather coarse and fine-grade sandpaper, stiff brushes for cleaning, and a pressure washer if available. You’ll also need quality brushes and rollers sized appropriately for your cabin’s log dimensions. Cheap applicators leave streaks and waste product.
Essential Materials Checklist:
- Microporous wood stain or timber preservative (2 coats worth)
- Sandpaper (60-grit and 120-grit)
- Stiff cleaning brushes and cloths
- Protective gloves and respirator mask
- Quality paint brushes and rollers
- Damp-proof membrane for foundation
- Guttering, downpipes, and fixings
- Wood filler for crack repairs
| Material Type | Purpose | UK Climate Benefit |
|---|---|---|
| Microporous stain | Wood protection and aesthetics | Allows moisture escape, prevents trapped water |
| Timber preservative | Deep rot and insect protection | Penetrates wood fibers in damp conditions |
| Damp-proof membrane | Foundation moisture barrier | Blocks rising damp from wet soil |
| Gutter system | Water management | Channels heavy rainfall away from structure |
Pro tip: Purchase 10-15% more stain than calculated surface area requires. Wood absorption varies, and running short mid-project creates uneven color patches that look unprofessional.
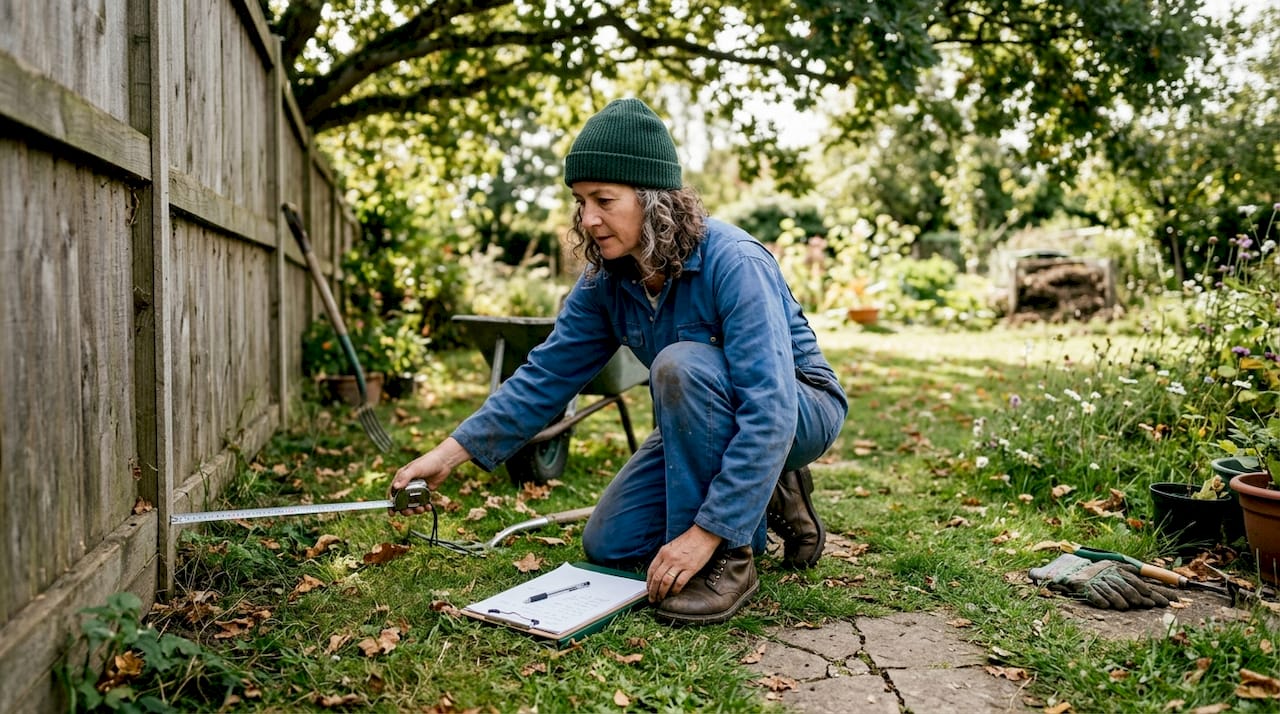
Step 1: Prepare and Clean Log Surfaces
Surface preparation determines whether your weatherproofing lasts years or fails within months. Timber Research and Development Association research shows skipping surface preparation leads to 35% of weatherproof failures due to poor adhesion and peeling.
Start by removing all moss, algae, dirt, and flaking old finishes from every log surface. Use a stiff brush for light cleaning or a pressure washer set to low pressure for stubborn buildup. High pressure damages wood fibers, so keep the nozzle moving and maintain distance.
Inspect each log for cracks, splits, or soft spots indicating rot. Fill small cracks with exterior wood filler and allow proper curing time. Larger damaged sections may need professional replacement to maintain structural integrity.
Sand rough patches and edges using 60-grit sandpaper first, then smooth with 120-grit for final preparation. This creates the clean, slightly porous surface that treatments need for proper penetration. Wipe away all dust with a damp cloth before proceeding.
Preparation Steps in Order:
- Remove loose debris, moss, and dirt with brushing or washing
- Inspect for damage and fill cracks with appropriate wood filler
- Sand surfaces smooth, working from coarse to fine grit
- Clean away all dust and allow wood to dry completely
- Test moisture content with a meter (should be below 20%)
Timing matters significantly. Never apply treatments to damp wood, as trapped moisture causes premature failure. Wait for at least two dry days after rain, and check weather forecasts to ensure 24-48 hours of dry conditions for curing. Understanding cleaning frequency for log cabins helps you maintain proper surface conditions year round.
Pro tip: Mark your calendar with the preparation date. Documenting each maintenance cycle helps you track when the next treatment is due and builds a valuable history for your cabin’s care records.
Step 2: Apply Timber Preservative and Sealants
Proper application of breathable, UK-approved products protects wood while maintaining its natural beauty and texture. The right technique ensures even coverage and maximum protection against our demanding climate.
Apply two coats of microporous wood stains or timber preservative, working along the wood grain with smooth, even strokes. The first coat seals and protects deep into the fibers, while the second coat provides surface-level water resistance and UV protection. Research on wood finishes shows microporous wood stains retain 70-80% more natural wood texture and appearance compared to thick opaque paints, favored by UK homeowners for aesthetic and protective balance.
Avoid non-breathable paints or heavy sealants that trap moisture inside the wood. When water vapor cannot escape, it builds pressure that causes paint to bubble and peel while creating perfect conditions for rot and decay underneath. Breathable products let the wood “work” naturally with seasonal moisture changes.
Allow adequate drying time between coats according to product instructions. Rushing this step compromises adhesion and protective qualities. UK humidity often extends drying times beyond label estimates, so check the surface is fully dry before applying the second coat.
Application Best Practices:
- Work in sections to maintain a wet edge and avoid lap marks
- Apply thin, even coats rather than one thick application
- Pay extra attention to end grain, which absorbs more product
- Use a smaller brush for tight corners and log intersections
- Keep the working area well ventilated throughout application
“The key to long-lasting protection is building thin layers that work together, not a single thick barrier that eventually fails. Patience during application pays dividends in durability.”
Temperature matters during application. Work when temperatures are between 10-25°C for optimal product performance. Cold conditions slow curing, while excessive heat causes products to dry too quickly, preventing proper wood penetration.
Step 3: Protect Roof and Install Drainage Systems
Water management separates cabins that last from those requiring constant repairs. Proper roof protection and drainage installation redirect rain away from vulnerable walls and foundations.
Maintain minimum 150mm eaves (roof overhang) extending beyond wall edges. This simple architectural feature throws rainwater clear of vertical surfaces, dramatically reducing moisture exposure. If your cabin lacks adequate overhang, consider retrofitting extended fascia boards.
Install quality gutters and downpipes to channel roof runoff safely away from the structure. Position downpipes to discharge at least 1-1.5 meters from the cabin base, directing water toward natural drainage or soakaways. Poor drainage causes up to 40% of water ingress problems in garden buildings.
Check roof sealants, felt, and shingles regularly for wear or damage. Small leaks grow quickly in our wet climate, often causing hidden damage before becoming visible inside. Address any issues immediately to prevent costly structural repairs later. Explore alternative roofing options that may offer enhanced protection for your specific situation.
Essential Drainage Components:
- Gutters sized appropriately for roof area (typically 100-125mm for cabins)
- Downpipes with leaf guards to prevent blockages
- Gutter brackets spaced correctly for proper fall and support
- Underground drainage pipes or soakaways for discharge
| Protection Level | Features | Water Protection Benefit |
|---|---|---|
| Basic | Roof felt only, no gutters | Minimal, water runs down walls |
| Standard | Roof felt plus basic gutters | Moderate, some wall exposure remains |
| Enhanced | Quality roofing, full gutter system, adequate overhang | Excellent, water directed completely away |
For comprehensive protection, read our detailed waterproofing roof and drainage tips covering advanced techniques for challenging installations.
Pro tip: Clean gutters and downpipes twice yearly, in autumn after leaf fall and again in spring. Set recurring phone reminders now to ensure you never forget this critical maintenance task.
Step 4: Foundation Damp-Proofing and Ground Protection
Your cabin’s foundation faces constant moisture threats from UK’s notoriously wet soils. Proper ground-level protection prevents rising damp that rots wood from the bottom up, often invisibly until serious damage occurs.
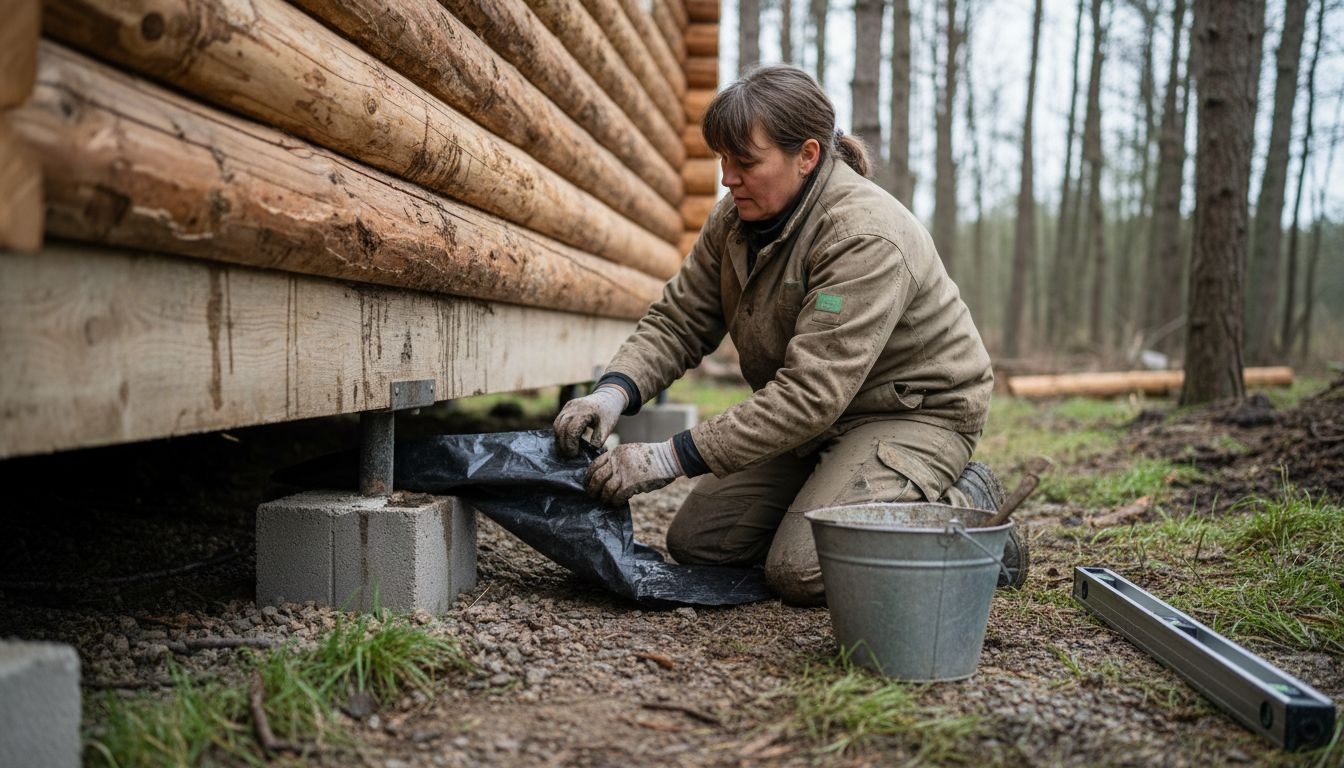
Install a damp-proof membrane beneath your cabin base before construction, or retrofit one if building on an existing platform. This impermeable barrier blocks moisture rising from soil through capillary action. Without it, even treated wood absorbs ground moisture that leads to decay.
Ensure proper drainage by sloping ground away from the cabin on all sides. A gradient of 1:60 (approximately 15mm drop per meter) directs surface water away effectively. Standing water pooling against foundations inevitably finds its way into the structure.
Use gravel beds or raised platforms to eliminate direct contact between cabin timbers and wet soil. A 150mm gravel layer provides drainage space and airflow that keeps the underside dry. Raised platforms on concrete blocks or posts offer even better protection in particularly damp locations. Understanding moisture control for foundations helps you implement the most effective solution for your site conditions.
Foundation Protection Methods:
- Lay heavy-duty damp-proof membrane across entire base area
- Create 100-150mm gravel drainage layer under cabin
- Slope surrounding ground away at 1:60 gradient minimum
- Maintain 150mm clear space between soil and lowest timber
- Install French drains if site has persistent water pooling
- Use concrete pad or paving slab foundation in very wet areas
Ventilation under the cabin prevents moisture buildup in enclosed spaces. Ensure adequate airflow through foundation vents or gaps in skirting boards. Stagnant, damp air creates ideal conditions for wood rot and attracts insects.
Step 5: Regular Maintenance and Inspection
Weatherproofing is not a one-time task but an ongoing commitment that protects your investment and extends cabin life significantly. Regular attention catches small problems before they become expensive disasters.
Inspect and reapply timber preservative every 2 to 3 years as a baseline schedule. High-exposure areas like south-facing walls in direct sun or north-facing sections in constant shade may need more frequent treatment. Keep records of application dates to track your maintenance cycle accurately.
Clean gutters and downpipes at least twice yearly, removing leaves, moss, and debris that cause blockages and overflows. Blocked gutters dump water directly onto walls, defeating the entire drainage system. This simple task takes 30 minutes but prevents thousands in potential damage.
Check logs thoroughly for early signs of rot, mold, leaks, or insect activity during each inspection. Look for soft spots when pressing wood, discoloration indicating moisture penetration, or small holes from boring insects. Early detection allows simple spot repairs instead of major reconstruction. Monitoring moisture levels with an inexpensive meter provides objective data about your cabin’s condition.
Maintenance Schedule:
- Monthly visual inspection walking around entire cabin exterior
- Seasonal gutter cleaning in autumn and spring
- Annual detailed inspection of all surfaces, roof, and foundation
- Bi-annual or tri-annual timber treatment reapplication
- Immediate spot repairs when issues are discovered
Set recurring calendar reminders now for each maintenance task. Digital calendars make it easy to schedule annual or biannual reminders that ensure you never miss critical care windows. Our spring maintenance tips provide a comprehensive seasonal checklist.
Common Mistakes and Troubleshooting
Even well-intentioned cabin owners make weatherproofing errors that compromise protection and waste time and money. Learning from common mistakes helps you avoid frustrating setbacks.
Skipping proper surface preparation causes the majority of treatment failures. Paint or stain applied over dirty, damp, or flaking surfaces simply will not bond correctly. Within months, you’ll see peeling and need to start over completely. Always invest time in thorough cleaning and sanding.
Using non-breathable coatings traps moisture that accelerates wood decay despite appearing protective initially. Thick paints and impermeable sealants look good briefly but create hidden problems. Always choose products specifically labeled as breathable or microporous for exterior timber.
Neglecting roof drainage leads to concentrated water damage at specific points. Overflowing gutters or missing downpipes direct thousands of liters directly at walls and foundations during heavy rain. Even perfect wood treatment cannot withstand this constant deluge.
Ignoring foundation damp-proofing allows rising damp to rot your cabin from the ground up. This invisible enemy works slowly but relentlessly, often discovered only when structural damage becomes severe. Prevention costs far less than remediation.
Delaying treatment reapplication lets protection degrade until wood becomes exposed and vulnerable. Once moisture penetrates untreated wood, damage progresses rapidly. Stick to your maintenance schedule religiously.
Avoiding Common Pitfalls:
- Never rush surface preparation to save time
- Test new products on a small hidden area first
- Verify breathability specifications before purchasing sealants
- Address drainage issues immediately when discovered
- Keep detailed maintenance records with dates and products used
- Inspect hidden areas like under eaves and behind pipes
Pro tip: Always test any new sealant or stain on a small, inconspicuous area first. Check breathability by applying water droplets after drying. Beading indicates water resistance, but absorption into the wood shows breathability is functioning correctly.
Expected Results and Longevity Benchmarks
Understanding realistic outcomes helps you appreciate the value of proper weatherproofing and stay motivated to maintain protection over time. The data strongly supports investing effort in comprehensive treatment.
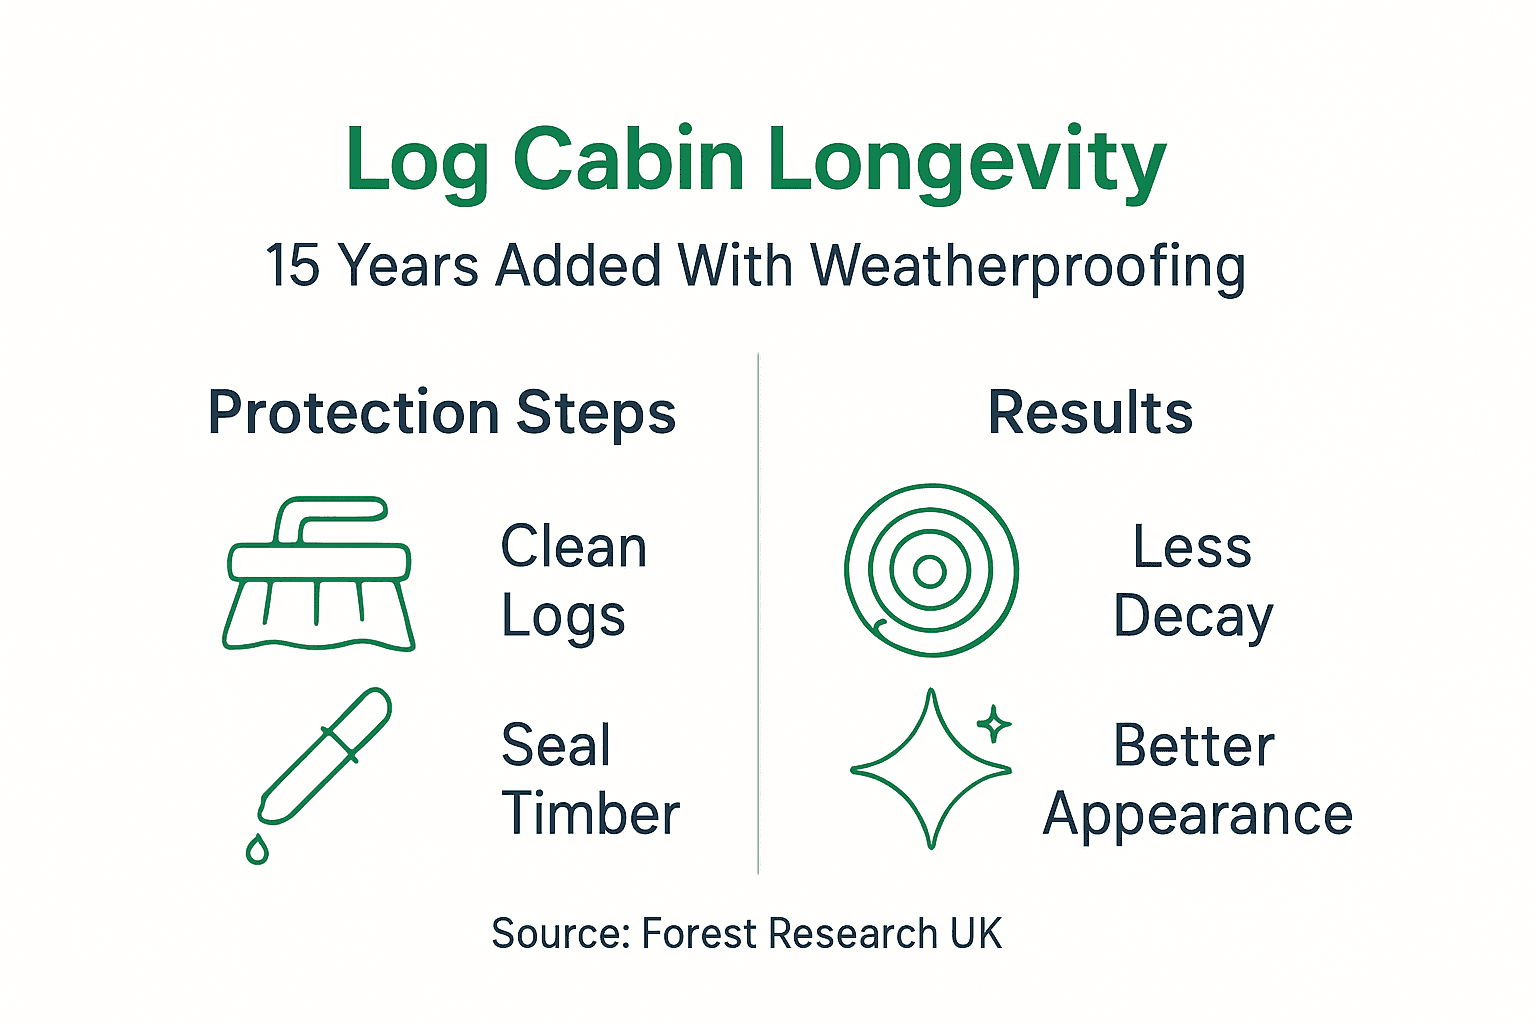
Forest Research UK confirms proper treatment can extend cabin lifespan by 15 years, with reduction of moisture ingress by up to 50% when using correct sealants, and that maintenance cycles every 2-3 years ensure long-term durability. These aren’t marketing claims but measured results from real-world UK conditions.
Moisture ingress reduction translates directly to slower decay, less frequent repairs, and better appearance throughout your cabin’s life. Wood that stays drier resists rot, maintains structural strength, and provides a hostile environment for insects and fungi.
Consistent maintenance cycles create cumulative protective benefits. Each reapplication refreshes the barrier before it fully degrades, maintaining continuous protection rather than allowing gaps where damage occurs. This proactive approach costs less overall than reactive emergency repairs.
| Scenario | Cabin Lifespan | Moisture Levels | Maintenance Frequency |
|---|---|---|---|
| No weatherproofing | 8-12 years | Very high (25%+) | Constant repairs |
| Basic treatment only | 12-18 years | High (18-25%) | Frequent spot fixes |
| Proper comprehensive protection | 25-30+ years | Low (12-15%) | Scheduled every 2-3 years |
Visual appearance also improves dramatically with proper care. Well-maintained cabins retain rich wood color and texture, while neglected structures turn grey, crack, and look shabby within just a few years. Aesthetic value matters if you ever sell your property.
Explore Bespoke Log Cabins and Weatherproofing Solutions
Applying these weatherproofing techniques protects your investment for decades of reliable use. When you’re ready to order bespoke log cabins online, you’ll have the knowledge to maintain them properly from day one.

Our specialists provide comprehensive weatherproofing tips from experts and professional installation services ensuring your cabin receives optimal protection from the start. UK-designed cabins built for our climate, maintained with proven methods, deliver the outdoor space you’ll enjoy for a lifetime.
Frequently Asked Questions
How often should I reapply timber preservatives on my log cabin?
Reapply timber preservatives every 2 to 3 years for optimal protection in UK conditions. Schedule applications during dry weather in late spring or early autumn when temperatures are moderate and humidity is lower. Following our spring maintenance tips ensures you catch the ideal treatment windows.
What are the signs of moisture damage I should watch for?
Look for peeling paint or stain, soft or spongy wood when pressed, visible mold growth, and persistent musty odors inside your cabin. Discoloration, warping, or gaps between logs also indicate moisture problems. Regular inspections catch these moisture damage signs before they require expensive structural repairs.
Can I use any wood stain for weatherproofing my UK log cabin?
Use only breathable, UK-approved microporous stains specifically formulated for exterior timber in wet climates. Non-breathable paints and sealants trap moisture inside wood, causing hidden rot and decay despite initial good appearance. Quality UK-suitable wood stains allow moisture vapor to escape while repelling liquid water effectively.
How important is roof drainage for my log cabin’s longevity?
Proper gutters and adequate roof overhangs prevent water damage to walls and foundations, making them critically important. Neglecting drainage causes up to 40% of water ingress problems in garden buildings, leading to rot, mold, and structural damage. Understanding roof drainage importance helps you prioritize this essential protection system.