
Garden cabin installation: step-by-step workflow guide
TL;DR:
- Proper planning and site assessment are essential to ensure smooth garden cabin installation.
- Foundation choice and workflow sequence significantly impact the cabin’s durability and stability.
- Custom features should be integrated early in the process to avoid delays and structural issues.
Planning a bespoke garden cabin is exciting, but it’s easy to feel overwhelmed before a single log is laid. Many UK homeowners dive straight into choosing styles and sizes, only to discover mid-project that they’ve skipped critical planning steps. The result? Delays, extra costs, and a lot of unnecessary stress. Getting your installation workflow right from the start is what separates a smooth, satisfying build from a frustrating one. This guide walks you through everything, from site preparation and foundation choices to custom design integration and common mistakes to avoid, so you can enjoy your new cabin without the headaches.
Table of Contents
- What to consider before installation
- Step-by-step garden cabin installation workflow
- Custom design options and workflow integration
- Troubleshooting and common installation mistakes
- Expert perspective: Why workflow matters in garden cabin installation
- Find the perfect bespoke garden cabin for your home
- Frequently asked questions
Key Takeaways
| Point | Details |
|---|---|
| Plan ahead | Careful planning before installation sets the foundation for a successful garden cabin build. |
| Follow workflow | Adhering to a step-by-step installation process minimises errors and delays. |
| Integrate custom features | Schedule bespoke design choices early to avoid workflow disruption and achieve your vision. |
| Troubleshoot proactively | Anticipate and resolve common installation mistakes for lasting cabin quality. |
What to consider before installation
With a clear sense of why workflow matters, let’s look at what you need to get started.
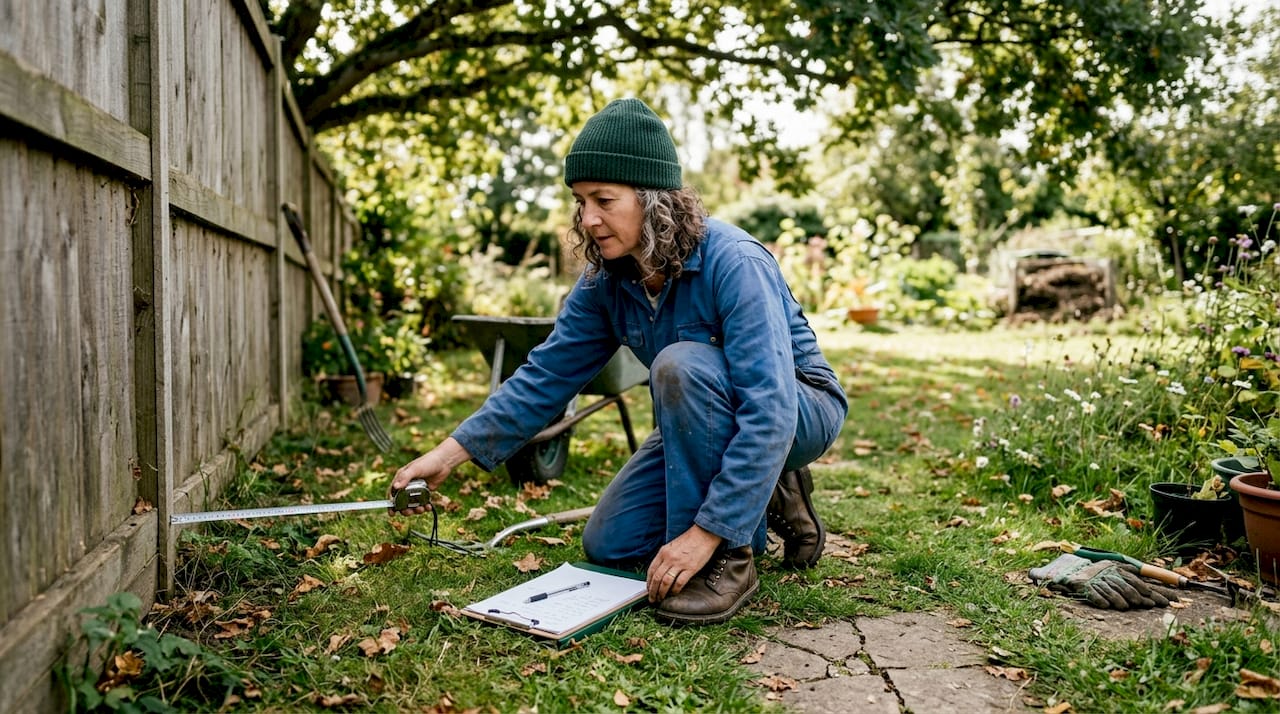
Before anything else, think about where your cabin will sit. Access to the site matters more than most people realise. Can materials be delivered easily? Is there enough clearance for assembly? These questions sound simple, but they catch homeowners out regularly. Walk your garden and measure twice before committing to a position.
Permissions are another early priority. Most garden cabins fall under permitted development, meaning no planning permission is needed, but there are rules around height, proximity to boundaries, and whether the cabin will be used as living accommodation. Always check with your local council before ordering.
Here’s a quick overview of what you’ll want to have ready before installation begins:
| Item | Details |
|---|---|
| Site survey | Measurements, drainage check, access routes |
| Permissions | Permitted development confirmation or planning approval |
| Foundation materials | Concrete, timber frame, or ground screws |
| Cabin components | Logs, roof panels, windows, doors |
| Tools | Spirit level, drill, saw, rubber mallet |
| Design documentation | Bespoke drawings, specification sheets |
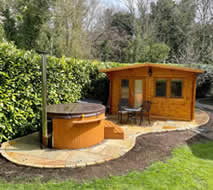
Foundation choice is one of the most important decisions you’ll make. As covered in the foundation and flooring tips guide, foundation and flooring choices determine cabin stability. A poorly prepared base leads to warping, damp, and structural issues down the line. Concrete slabs are popular for their durability, while timber frames offer flexibility on uneven ground.
If you’re planning a bespoke build, it’s worth reviewing bespoke cabin design advice early. Custom features like partition walls or extra glazing need to be factored into the foundation plan, not added as an afterthought. Equally, if your garden has mature trees nearby, consider professional garden maintenance services to clear roots or overhanging branches before work begins.
Pro Tip: When planning your footprint, add at least 500mm of extra space around the cabin perimeter. This gives you room for future additions like a veranda, external cladding, or drainage channels without having to start from scratch.
Step-by-step garden cabin installation workflow
Once planning and procurement are complete, you’re ready to tackle the installation steps.
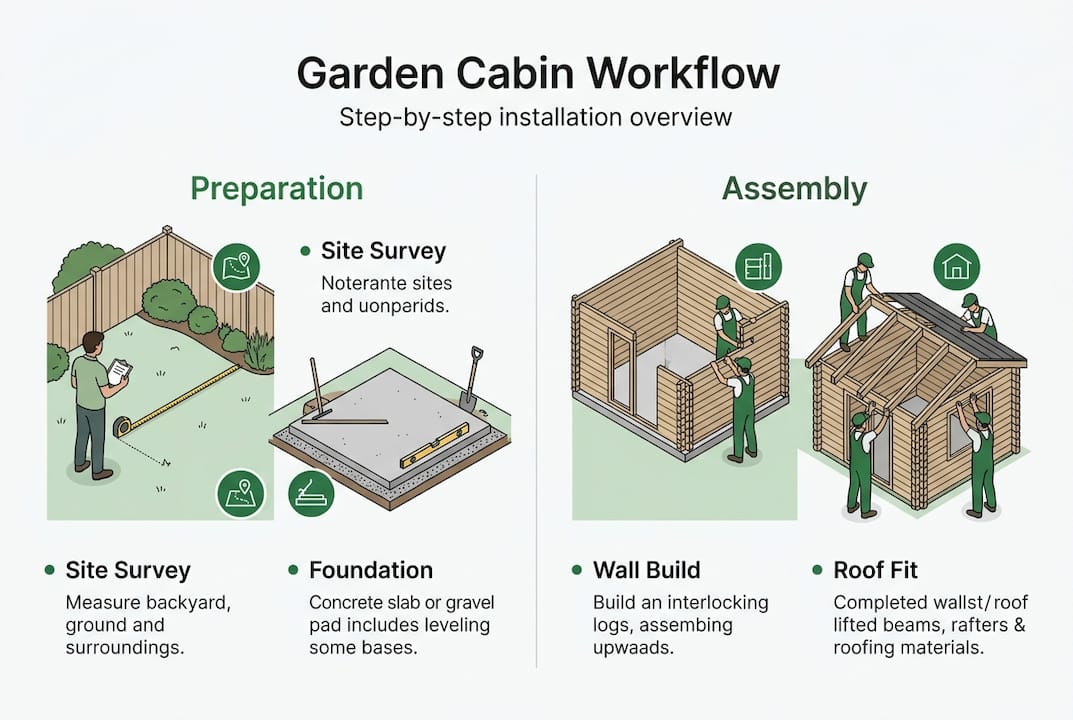
- Clear and level the site. Remove vegetation, roots, and debris. A level surface is non-negotiable. Even a slight slope causes problems during assembly. Professional site clearing benefits your build long-term by reducing root interference and improving drainage.
- Lay the foundation. Pour your concrete slab or assemble your timber frame. Allow concrete at least 48 hours to cure fully before placing any weight on it.
- Install the base frame. This is the structural skeleton your cabin sits on. Check it’s square using the 3-4-5 triangle method (measure 3 units along one side, 4 along another, and the diagonal should be 5).
- Assemble the walls. Stack and interlock your log sections working from the corners inward. Keep a spirit level handy at every course.
- Fit the roof structure. Attach roof beams, then add roof boards and felt. Ensure all joins are sealed to prevent water ingress.
- Install doors and windows. These are fitted into pre-cut openings. Check alignment carefully before fixing permanently.
- Add insulation and interior finishing. Insulation boards, vapour barriers, and interior lining boards complete the shell.
- Connect electrics if required. Always use a qualified electrician. Read up on electrical setup in cabins before planning your cable routes.
Here’s a quick comparison to help you decide between DIY and professional installation:
| Factor | DIY | Professional |
|---|---|---|
| Cost | Lower upfront | Higher upfront |
| Time | Longer | Faster |
| Skill required | Moderate to high | Handled for you |
| Risk of errors | Higher | Lower |
| Warranty impact | May affect | Usually preserved |
As highlighted in the installation experience overview, professional installation ensures safety and longevity, particularly for larger or more complex builds.
Pro Tip: Before assembly day, lay out all components and label them with chalk or masking tape. Matching parts to your assembly diagram in advance saves enormous time and reduces the chance of fitting errors.

Custom design options and workflow integration
Integrating custom design options is vital for personalising your space without compromising the installation process.
Bespoke cabins are brilliant precisely because they can be tailored to your life. As noted in the how to design a bespoke garden cabin guide, custom features adapt cabins for home offices, studios, gyms, and more. The key is weaving those choices into the workflow from the very beginning, not bolting them on at the end.
Think about what your cabin needs to do. A home office needs good natural light and power points. A garden studio might need soundproofing. A hobby room could benefit from extra storage partitions. Each of these features has implications for your foundation, wall assembly, and finishing schedule.
Here are some of the most popular customisations UK homeowners choose:
- Extra or oversized windows for natural light
- Internal partition walls to create separate zones
- Upgraded insulation for year-round use
- Veranda or decking attached to the cabin
- Reinforced flooring for heavy equipment
- Bespoke door configurations, including double or bi-fold options
- Integrated cable management for electrics and data
You can explore the full range of custom cabin features available to get a feel for what’s possible before you commit to a design. It’s also worth thinking about your garden as a whole. Integrating your cabin sensitively with surrounding planting and trees, with support from healthy garden integration advice, keeps your outdoor space looking cohesive and cared for.
Pro Tip: Book your customisation decisions at least two weeks before the installation date. Bespoke components like non-standard window sizes or specialist insulation boards often have longer lead times, and a delay in one part holds up the entire build.
Troubleshooting and common installation mistakes
Even the best workflow can run into trouble spots. Here’s how to spot and solve them.
The most common issue we hear about is a misaligned foundation. If your base isn’t perfectly level and square, every subsequent step compounds the problem. Walls won’t sit flush, doors won’t close properly, and roof panels won’t align. Check your foundation at least three times before moving on.
Another frequent mistake is assembling components in the wrong order. Roof beams fitted before walls are fully secured, or windows installed before the frame has settled, create real headaches. Always follow the manufacturer’s assembly sequence, even if a shortcut seems tempting.
Seasonal timing matters too. Installing a cabin in very wet or frosty conditions affects timber behaviour and adhesive performance. Good cabin maintenance tips start before installation, with smart timing choices. As the winter prep checklist makes clear, seasonal maintenance prevents long-term issues that are expensive to fix later.
Here’s a quick-reference list of common pitfalls and how to avoid them:
- Uneven ground: Always re-check levels after laying each foundation layer
- Skipping the damp-proof membrane: This leads to moisture creeping up from the ground into your floor
- Overtightening fixings: Timber needs room to expand and contract with temperature changes
- Ignoring roof felt overlaps: Gaps of even a few millimetres let water in over time
- Leaving gaps around windows and doors: Seal all joints with appropriate outdoor-grade sealant
Expert warning: Weatherproofing is not optional. Skipping or rushing the sealing stage is the single most common cause of long-term cabin damage in the UK climate. Treat all exposed timber before and after installation, and revisit annually.
Expert perspective: Why workflow matters in garden cabin installation
With technical guidance in place, let’s consider the real-world value of workflow from an expert’s point of view.
Here’s something that surprises many homeowners: the quality of your materials matters far less than the order in which you use them. We’ve seen beautifully specified cabins fail within two years because the installation sequence was rushed or ignored. And we’ve seen modest, straightforward builds last decades because the workflow was followed carefully.
The one step that’s almost always skipped? A proper pre-installation site assessment. People measure the cabin, not the ground beneath it. Soil type, drainage patterns, and root systems all affect long-term stability in ways that only become obvious 12 months later.
A clear workflow also saves money. Rework is expensive. Fixing a misaligned foundation after walls are up costs far more than getting it right first time. Cabins that add value to your home are the ones built with patience and process, not speed. Treat the workflow as your most valuable tool, not a formality to tick off.
Find the perfect bespoke garden cabin for your home
Ready to put your new workflow knowledge into action? Explore your options for bespoke garden cabins.
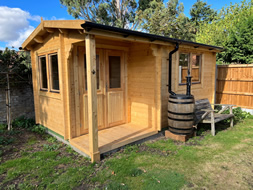
At Log Cabin Kits, we specialise in bespoke and custom-build garden cabins designed to fit your space, your style, and your budget. Whether you’re after a compact home office or a generous garden studio, we’ve got options to inspire you.

Browse our garden log cabin gallery to see real builds and get ideas for your own project. If you’re ready to go bespoke, our bespoke cabin design service walks you through every decision. Or explore our full range of custom build log cabins to find the right starting point. We’re here to make the whole process feel easy and enjoyable.
Frequently asked questions
Do I need planning permission for a garden cabin in the UK?
Most garden cabins don’t require planning permission if they meet size and placement rules, but always check with your local council before proceeding.
How long does garden cabin installation usually take?
Installation typically takes between two and five days depending on cabin size and site preparation. Professional installation can add both efficiency and value to the process.
What is the best foundation for a garden cabin?
Concrete slabs or timber frames are most commonly used, and the best choice depends on your site’s soil and drainage. Foundation and flooring choices directly determine your cabin’s long-term stability.
Can I customise my cabin after installation has started?
Some features can be adjusted mid-installation, but major layout changes should be planned well in advance. Custom features like partition walls and specialist glazing need to be specified before the build begins to avoid delays.