
Delivery checks for Pressure treated UK cabin timber: Reseal 1–3 Years
Pressure treated timber protects the parts of a garden cabin most at risk of rot by forcing preservative deep into the sapwood, and that’s why it’s the standard choice for cabin bases, frames and floor bearers. Look for TANALISED or TANALITH marks as a sign the wood has been through a proper industrial process, and lean on a resource like the LogCabinKits care guide once your cabin is up. The catch: pressure treatment isn’t waterproofing. You still need good sealing, sensible detailing, and a bit of ongoing care. Read on for how the process works, what it does and doesn’t fix, what to check before you buy, and how to look after treated timber once it’s in your garden.
TL;DR:
- Pressure treated timber resists rot and insects better near ground contact, but it does not provide waterproofing or prevent surface water accumulation.
- Ensuring treatment marks like TANALISED or TANALITH are present indicates proper industrial processing, and timber should be fully re-dried after treatment for optimal durability.
- Proper installation, including reinforced foundations and correct fixings, is crucial to prevent early damage despite the timber’s pressure treatment.
- Regular maintenance, such as seasonal cleaning, resealing every one to three years, and checking for cracks or discolouration, greatly extends the lifespan of treated timber structures.
- Always confirm the treatment retention level, treatment type, and use-class rating before purchase, and keep delivery documentation to support warranty claims later.
Table of Contents
- What is pressure treated cabin timber, and how does it work?
- Pressure treated timber for cabins: what it gets right and where it falls short
- How long does pressure treated cabin timber actually last?
- Buying checklist: what to look for when your cabin timber arrives
- Caring for pressure treated cabin timber: the 2026 care routine
- Choosing the right grade and size of treated timber for your cabin
- Common installation mistakes that damage treated timber
- Standards and certification: what treated cabin timber should carry
- Author perspective: what actually matters when choosing treated timber
- How LogCabinKits helps you choose the right treated timber
- Sources
What is pressure treated cabin timber, and how does it work?
Pressure treatment pushes preservative deep into wood using vacuum and pressure cycles, rather than just brushing or dipping a coating onto the surface. The timber goes into a sealed cylinder, air is pulled out under vacuum, and preservative is then forced in under high pressure. That’s a very different process to painting a fence panel at home, and it’s why treated timber holds up so much longer outdoors.
There are two main approaches used commercially. Waterborne preservatives (the kind most cabin timber uses) typically go through a modified full-cell cycle, where the wood cells are flooded and filled with preservative. Oil-type preservatives tend to use high-pressure cycles suited to their different chemistry. Both are recognised industrial methods, not shortcuts, and the pressure-treatment process is well documented in timber industry guidance.
You’ll often see the terms TANALISED or TANALITH mentioned by suppliers. These refer to a specific high pressure treatment system widely used across the UK for decking, fencing, and garden buildings. If your cabin timber carries this mark, it’s been through a controlled, industrial-grade process rather than a quick surface dip.
Here’s what actually happens inside the wood:
- Preservative saturates the sapwood, the paler, more porous outer layer of the tree.
- Heartwood, the denser core, resists penetration and relies more on its own natural durability.
- A deep, even colour through the wood usually signals good saturation, according to research on heartwood versus sapwood durability.
- Fixed drying after treatment matters too, since properly dried timber holds preservative better and bleeds less.
That last point is easy to overlook, but it explains why timber straight from the treatment plant needs time to settle before it goes into a wall build.
Pressure treated timber for cabins: what it gets right and where it falls short
Treated timber earns its reputation for good reason. It resists rot and insect attack far better than untreated wood, lasts longer in exposed spots, and copes well with ground contact, which matters for cabin bases and bearers sitting close to damp soil. Suppliers who work with pressure treated garden buildings generally report lower maintenance demands and fewer call-outs for rot repairs compared with untreated structures.
Pro Tip: Ask your supplier which parts of your cabin kit are pressure treated and which aren’t. It’s rarely the whole structure, and knowing the split helps you plan your finishing schedule.
The main advantages, in order of what matters most for a cabin:
- Rot and insect resistance in the timber that touches or sits near the ground.
- A longer useful life before any structural component needs replacing.
- Better suitability for bearers, joists and base frames exposed to damp.
- Less frequent need for remedial treatment once the cabin is built.
But treatment has limits, and it’s worth being clear about them. It doesn’t stop water sitting on a horizontal surface, and untreated or lightly treated cladding, doors and windows still need proper finishing. Timber can move and shrink slightly as it dries out fully after treatment, which is normal but can surprise first-time builders. Some finishes don’t take well to freshly treated wood, and you might see minor staining or bleed-through in the early weeks, another reason drying time matters. As one buying guide puts it plainly, pressure treated timber is preservative protection against decay, not a substitute for weatherproofing.
How long does pressure treated cabin timber actually last?
Most treated cabin timber gives many years of solid service, but the honest answer is “it depends,” and the factors that shift that answer are worth knowing before you build. Exposure conditions and how the timber is used both play into it, which is why the industry leans on use-class guidance under BS EN 335 to match treatment retention levels to the job. A bearer sitting in constant ground contact needs a different retention level to a wall panel sitting above a solid base.
A handful of practical issues shorten lifespan far more often than the timber itself is to blame:
- A poor base or slab that lets water pool against the cabin frame.
- Standing water or “ponding” on flat horizontal surfaces that never gets a chance to dry.
- Fixings that pierce protective layers without any follow-up sealant.
- Skipping the recommended drying period before painting or sealing.
When you’re comparing suppliers, ask direct questions rather than taking marketing claims at face value. What’s the treatment retention level for this component? Was the timber fully re-dried after treatment? Does the guarantee cover just the treatment, or the whole timber section? A supplier who can answer clearly is usually one worth buying from.
Buying checklist: what to look for when your cabin timber arrives
Getting the checks right at delivery saves headaches later, and it only takes a few minutes. Here’s what to look for and ask before you sign off on a delivery.
- Check for treatment marks. Look for TANALISED or TANALITH stamps, or written confirmation from the supplier of which treatment plant processed the wood.
- Look at the colour. An even, consistent tone through visible end grain usually means good preservative saturation; patchy or pale patches are worth questioning.
- Check for excess moisture. Timber shouldn’t be dripping wet on arrival, and a strong chemical smell can signal it hasn’t been dried properly, both flagged as practical delivery checks worth running on any treated timber order.
- Ask about preservative type. Waterborne and oil-type systems behave differently after installation, and knowing which one you have affects how soon you can paint or seal.
- Ask what the timber is rated for. Ground contact, above-ground exposure, or interior use each call for different retention levels.
Pro Tip: Keep photos of the delivery, including any visible stamps or labels. If a warranty question comes up two years later, that evidence is worth its weight in gold.
If a delivery arrives with no documentation at all, that’s a red flag worth chasing before installation begins, not after.
Caring for pressure treated cabin timber: the 2026 care routine
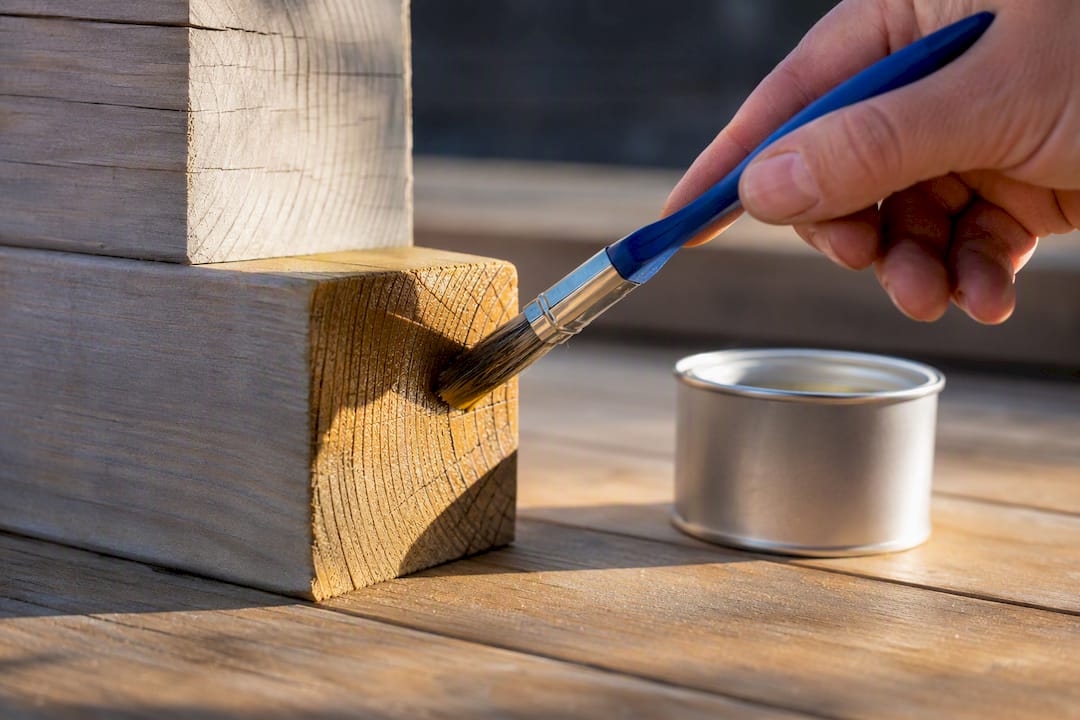
Good aftercare starts before the first panel goes up. Let the timber acclimatise to your garden’s conditions for a few days if possible, and always cut and reseal any exposed end grain, since end grain absorbs moisture far faster than the face of a board. Waiting for the recommended drying period before applying water-based top coats matters more than most builders expect, and it ties back to the best management practices the treatment industry recommends after any pressure cycle.
Once your cabin is standing, ongoing care is simple but needs consistency:
- Clean cladding gently each season to remove dirt and green algae before it takes hold.
- Reseal on the schedule your finish recommends, usually every one to three years depending on the product.
- Check for surface cracking early and re-coat before it opens a path for water.
- Keep guttering and drainage clear so water never sits against the base timber.
A cabin that gets a proper re-seal every couple of years and stays clear of standing water will consistently outlast one left to fend for itself, no matter how good the initial treatment was.
If anything looks off, discolouration that won’t clean off, soft patches, or a warranty question you can’t answer yourself, contact your supplier directly rather than guessing. Full care routines, including seasonal timing and product recommendations, are available in the 2026 wood treatment care guide.
Choosing the right grade and size of treated timber for your cabin
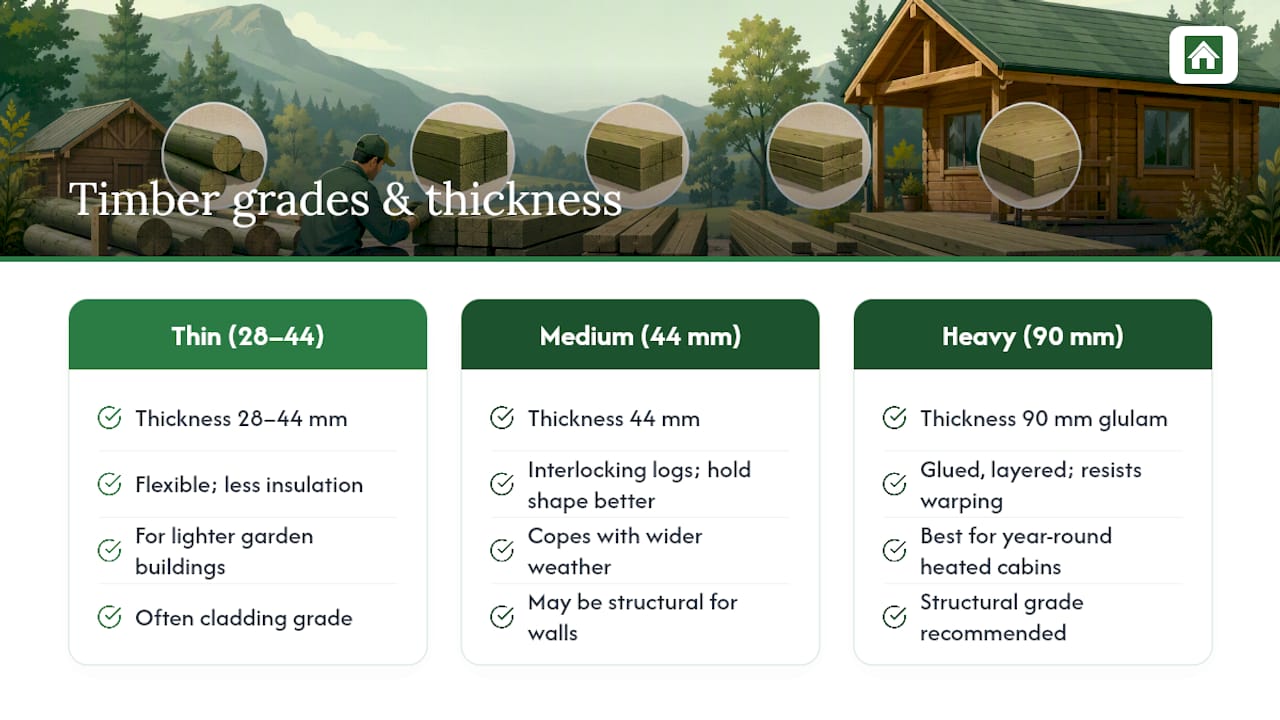
Not all treated timber suits every part of a cabin build, and getting the grade and thickness right at the ordering stage avoids problems later; for detailed timber choices and finishes, see TimberLine - Douglas houten overkappingen op maat. Thinner sections, often around 28mm to 44mm, work fine for lighter garden buildings, but they flex more and offer less insulation value. Thicker sections, including 44mm interlocking logs, hold their shape better and cope with a wider range of weather.
For anyone planning a cabin they’ll use year-round, heavier sections make a real difference. 90mm glulam construction uses glued, engineered timber logs that resist warping better than a single solid piece of the same thickness, since the layered structure balances out natural movement in the wood. That stability matters more in a cabin that’s insulated and heated than in a simple storage building.
Grade matters as much as thickness. Ask whether the timber is graded for structural use or purely for cladding, since bearers and frame components need a higher structural grade than decorative panels. If you’re planning a multi-room layout or an apex roof design with longer roof timbers, check that the supplier can confirm the span ratings for those specific sections. A bespoke garden pavilion or fully enclosed structure often calls for a mix of grades across the build, heavier at the base, lighter on the cladding, rather than one uniform spec throughout.
Common installation mistakes that damage treated timber
Most damage to treated cabin timber happens during the build, not years later. Cutting or drilling through treated sections without resealing the exposed cut is one of the most common mistakes, since it opens up untreated wood right at the point most likely to sit near ground moisture or catch rain.
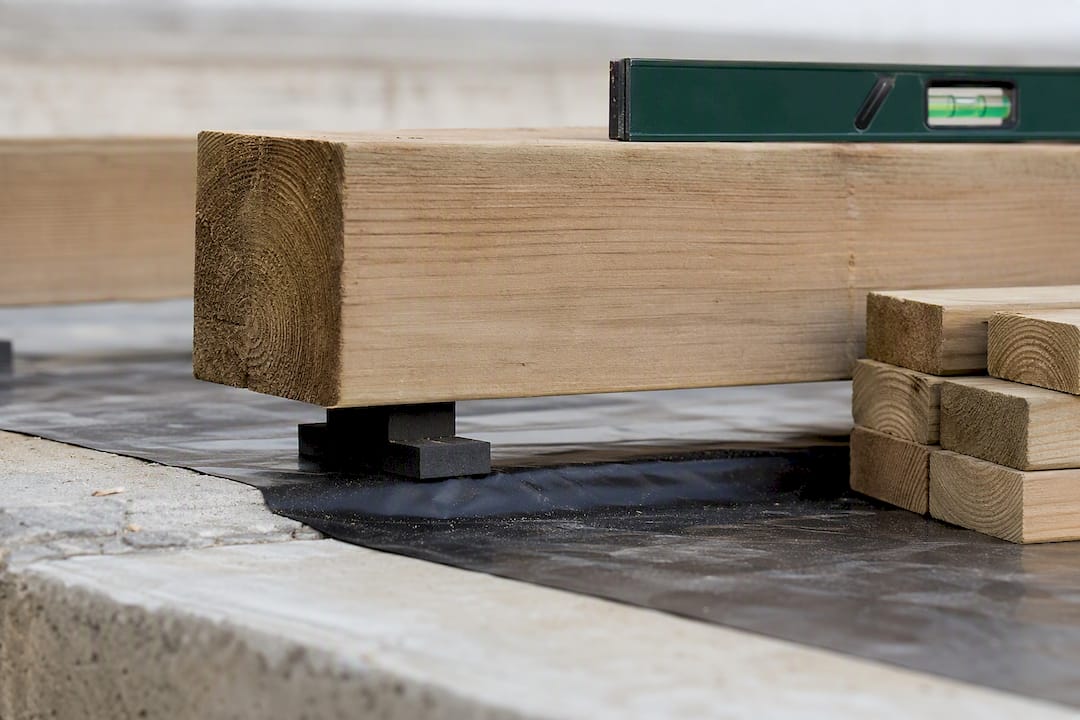
Rushing the base is another frequent issue. Treated timber still needs a level, well-drained foundation. Sitting cabin bearers directly on bare soil or an uneven slab traps moisture against the wood regardless of how well it was treated at the plant. A proper damp-proof membrane and a slightly raised base solve most of this before it starts.
Fixing methods matter too. Using the wrong fixings, ones that corrode or react with the preservative chemicals, can weaken joints over time. Stick to fixings rated for treated timber, and always pre-drill near edges to stop splitting, which is more likely in treated wood that hasn’t fully settled yet.
Finally, don’t rush the finishing stage. Painting or sealing before the timber has dried enough after treatment often leads to poor adhesion and early peeling. If you’re building your own garden summer house or contemporary cabin, build in a pause before you pick up a paintbrush, even if the weather window looks tempting.
Standards and certification: what treated cabin timber should carry
Reputable treated timber comes with some form of certification or reference to recognised standards, and it’s worth knowing what to look for rather than taking a supplier’s word alone. BS EN 335 sets out use classes for timber durability, covering everything from interior joinery through to timber in permanent ground contact, and it’s the standard most UK suppliers reference when they talk about “use class” or “hazard class” for a given product.
TANALISED and TANALITH marks indicate the timber has gone through a recognised industrial preservation system, applying preservative under the high pressure treatment process rather than a simple surface dip. These aren’t decorative labels, they reflect a specific, repeatable manufacturing standard.
Beyond the treatment mark itself, ask whether the timber comes with any documentation tying it back to a named treatment plant. This matters if you ever need to raise a warranty claim, since vague assurances don’t carry the same weight as a paper trail. Some suppliers also reference NTR standards, a Nordic quality mark for pressure-impregnated wood that sets minimum preservative retention levels. None of these certifications replace good building practice, but they give you a baseline to compare suppliers against rather than relying on marketing copy alone.
Author perspective: what actually matters when choosing treated timber
Treatment plus proper detailing beats untreated timber buried under heavy coatings every time. Coatings wear off; preservative in the wood doesn’t. For anyone building a cabin meant to last, thicker sections or glulam construction are worth the extra cost if you want long-term stability and insulation. and.
— Martin
How LogCabinKits helps you choose the right treated timber
Choosing the right cabin isn’t just about picking a size off a page, it’s about matching timber grade, thickness and treatment to how you’ll actually use the building. Options include standard kits and bespoke choices, with 90mm glulam sections for stability and double-skin builds for better insulation where it matters most.
If you’re not sure where to start, the cabin selection wizard walks you through sizing and treatment options based on how you plan to use the space. Want something entirely your own? Request a bespoke design quote and talk through wall thickness, layout and finish with a real person rather than trawling through pages of generic specs. Once your cabin’s up, the 2026 care guide covers exactly how to look after it. Browse the full garden log cabin range to see what’s possible, and get in touch if you’d like a tailored quote for your garden.
Sources
- Preserved Wood - chapter on pressure-treatment processes
- High pressure treatment process (TANALITH / TANALISED)
- What is pressure-treated timber? — SheShed FAQ