
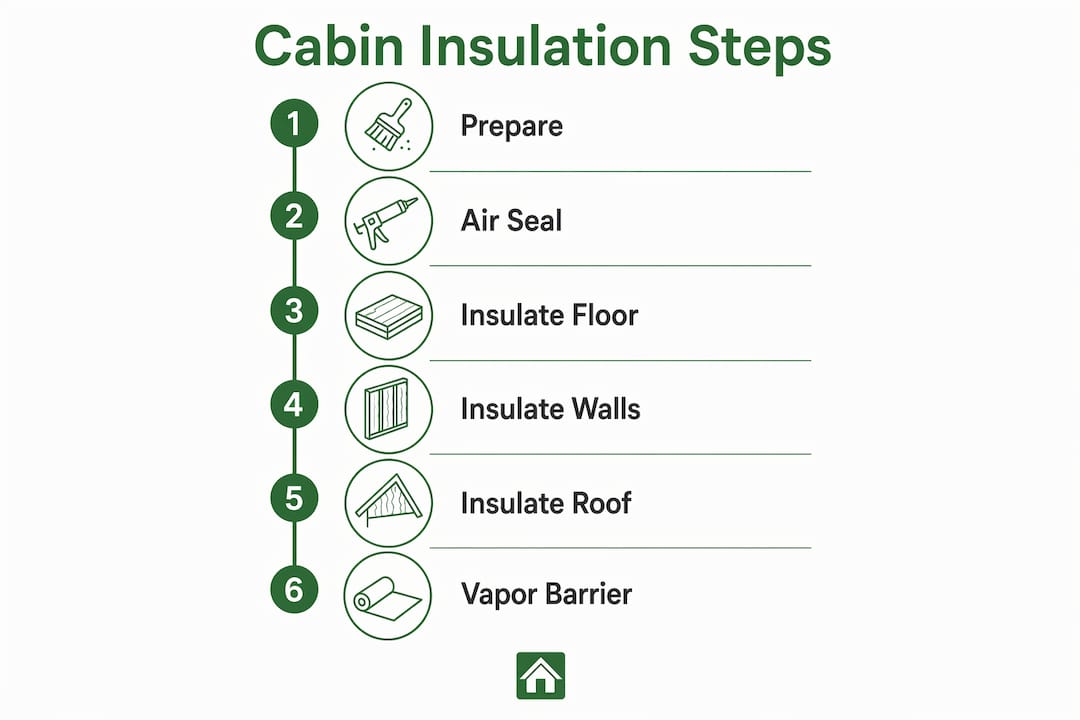
Step by step cabin insulation: your complete DIY guide
TL;DR:
- Proper cabin insulation involves sealing gaps first, then adding breathable materials like mineral wool for walls and rigid foam for roof and floors. Installing vapour barriers on the warm interior side and creating ventilation gaps prevents moisture buildup and timber decay. Following these steps ensures a comfortable, energy-efficient log cabin suitable for year-round use.
Cabin insulation is the process of adding thermal barriers to your log cabin’s floor, walls, and roof to retain heat in winter and stay cool in summer. Done correctly, a step by step cabin insulation project transforms a draughty garden building into a genuinely comfortable, year-round space. The key materials you’ll need include rigid foam boards, mineral wool, vapour barrier sheeting, and flexible chinking. Getting moisture control right from the start protects your timber structure and keeps your insulation performing for years to come.
What materials and tools do you need for cabin insulation?
Choosing the right materials is the foundation of any good cabin insulation guide. The wrong choice can trap moisture, reduce thermal performance, or even cause rot over time.
Insulation materials to consider:
- Rigid foam boards (such as Kingspan or Celotex): high R-value per centimetre, ideal for floors and roofs
- Mineral wool (such as Rockwool or Knauf): vapour permeable properties mean it lets assemblies breathe and reduces moisture trapping risks compared to faced insulation
- Fiberglass batts: budget-friendly and widely available, though less moisture-tolerant than mineral wool
- Sheep’s wool: a natural, breathable option that handles humidity well and suits eco-conscious builds
For air sealing, you’ll need flexible chinking, expanding foam (such as Soudal or Hilti), and silicone sealants. Flexible chinking stretches and compresses with the logs as they expand and contract through the seasons, keeping gaps sealed without cracking.
Tools you’ll need for the job:
- Hand saw or utility knife for cutting insulation boards
- Staple gun for fixing vapour barrier sheeting
- Foil tape or vapour barrier tape for sealing joins
- Spray foam gun for expanding foam application
- Tape measure, pencil, and safety gear (gloves, dust mask, safety glasses)
Pro Tip: Use professional-grade vapour barrier tape rather than standard duct tape. Standard tape loses adhesion over time in damp conditions, which defeats the purpose of an airtight seal.
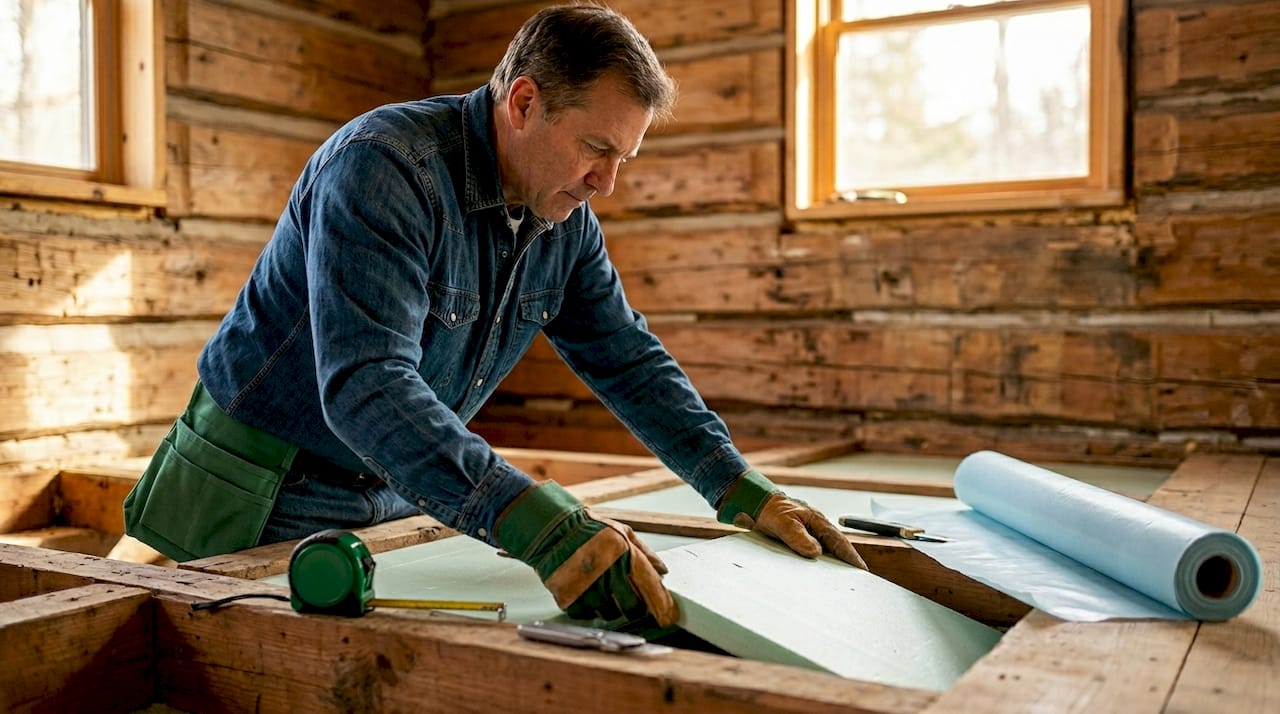
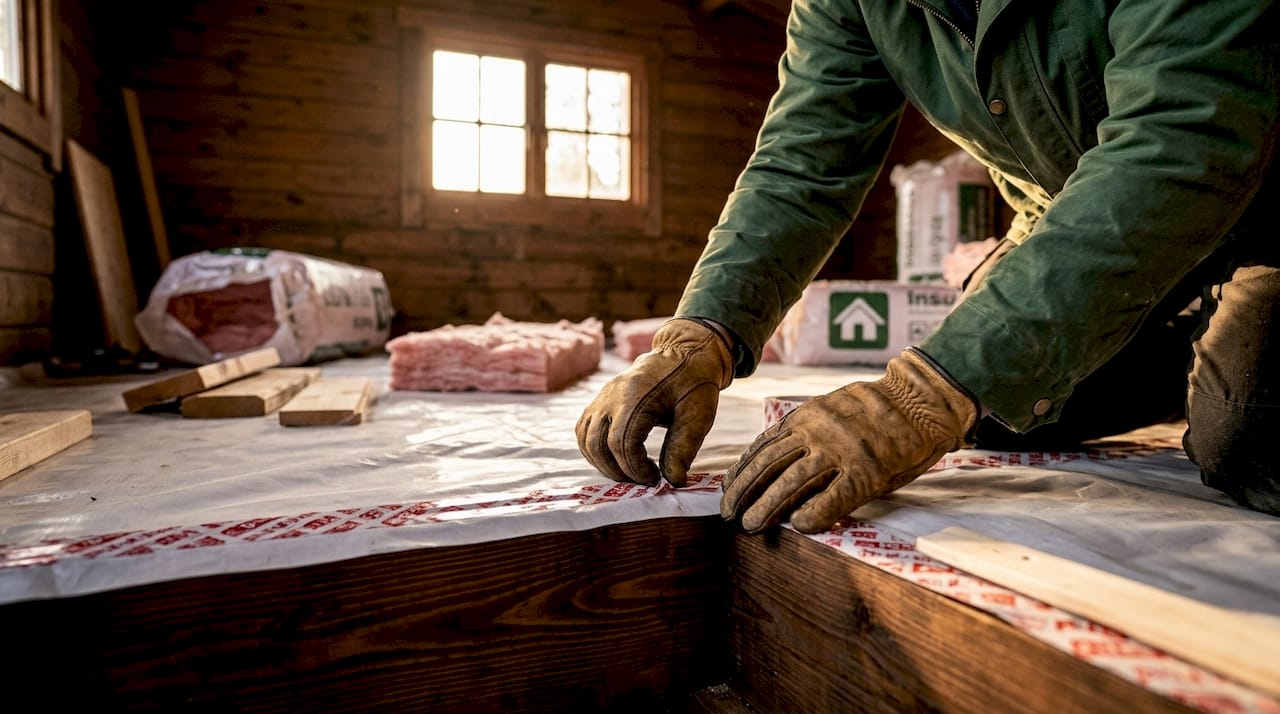
How to insulate your cabin floor step by step
The floor is the most overlooked part of a DIY cabin insulation project, yet it’s where a significant amount of heat is lost. A solid floor build-up also protects your cabin from ground moisture, which is the number one cause of timber rot in garden buildings.
Follow these steps in order:
-
Install a breathable moisture membrane between the floor joists, stapled tightly to the underside. This breathable membrane blocks dampness rising from the earth while still allowing any trapped moisture to escape downwards.
-
Cut and fit your insulation boards snugly between the joists. Rigid foam boards or mineral wool both work well here. A 4% void in batt insulation can drastically reduce thermal performance, so cut each piece carefully for a tight fit with no gaps.
-
Lay your vapour barrier sheeting on top of the insulation, on the warm side facing up into the cabin. Overlap all seams by at least six inches and seal with tape for a fully airtight layer. This stops warm, moist air from inside the cabin reaching the cold insulation and condensing.
-
Install your subfloor directly on top of the vapour barrier. Tongue-and-groove OSB or plywood works well and gives you a solid, flat surface to finish with your chosen flooring.
Pro Tip: Use timber battens pinned across the joists to hold insulation boards in place from below before you add the vapour barrier. It keeps everything snug while you work and prevents boards from dropping.
The two most common mistakes at this stage are skipping the moisture membrane entirely and leaving small gaps around the edges of insulation boards. Both lead to heat loss and, over time, timber decay.
How do you insulate cabin walls without damaging the logs?

Wall insulation in a log cabin requires a slightly different approach to a standard timber frame building. The logs themselves move with changes in temperature and humidity, so your insulation system needs to accommodate that movement.
Start by sealing every gap between the logs with flexible chinking. This is your first and most important step. Chinking is a flexible sealant designed specifically for log buildings, and it remains airtight even as the logs shift. Without it, any insulation you add to the interior will be undermined by cold air leaking straight through the wall.
For additional interior insulation, build a lightweight stud frame inside the cabin walls using 50mm or 75mm timber studwork. Fill the frame with mineral wool or fiberglass batts. Attach the frame to the logs using sliding brackets rather than fixed fixings. This allows the logs to move vertically without putting stress on the interior frame or cracking your plasterboard finish.
Vapour retarder placement is one of the most misunderstood parts of cabin insulation. The vapour retarder belongs on the warm-in-winter side of the insulation assembly, which is the interior face in a UK climate. Getting this wrong creates a dual vapour barrier condition that traps moisture in the wall cavity and causes rot.
Mineral wool is particularly well suited to wall assemblies because its vapour permeable properties allow the assembly to dry out if any moisture does get in. Faced insulation or rigid foam on both sides of a wall creates a sealed cavity with nowhere for moisture to go.
A few additional points worth covering for your cabin insulation guide:
- Fit double or triple glazed windows to eliminate cold spots around glass
- Seal door frames with compression draught strips
- Do not install a vapour barrier on both the inside and outside of the wall cavity
How to insulate the cabin roof properly
The roof is where the most heat escapes in any building, so getting this right pays dividends quickly. External roof insulation is the preferred method for log cabins because it keeps the interior ceiling beams visible and avoids reducing headroom.
-
Install a vapour control layer directly over the roof decking, lapping it up the walls by at least 150mm and taping all joins securely.
-
Lay rigid foam insulation boards tightly across the full roof area. Stagger the board joints so no two joins line up, which eliminates thermal bridging at the edges.
-
Fix vertical counter battens over the insulation boards, running from ridge to eaves. These create a ventilated air gap beneath the final roofing material, which prevents condensation from building up and damaging the roof structure.
-
Add horizontal tiling battens across the counter battens, then fix your chosen roofing material. Cedar shingles, metal roofing, and felt shingles all work well on garden log cabins.
Pro Tip: Press each insulation board firmly against its neighbour and check for gaps before fixing the counter battens. Even a small gap at a board joint creates a cold bridge that undermines the whole roof assembly.
The ventilated air gap is non-negotiable. Without it, warm moist air from inside the cabin meets the cold underside of the roofing material and condenses. Over time, that moisture saturates the insulation and causes the roof structure to rot.
Common challenges and how to fix them
Even a well-planned insulating a cabin tutorial can run into problems. Here are the most common issues and how to deal with them.
-
Air leaks undermining your insulation: Insulation without air sealing is like wearing a jumper full of holes. Air sealing cuts heating and cooling costs by 10 to 20% with a relatively modest materials investment, making it the highest return upgrade you can make. Seal attic floors, rim joists, window frames, door frames, and electrical outlets before you add any insulation.
-
Gaps reducing thermal performance: A small void in your insulation batt reduces effective R-value by half. Take the time to cut every piece accurately and press it firmly into place.
-
Dual vapour barrier mistakes: Placing a vapour barrier on both sides of a wall cavity traps moisture with nowhere to go. Incorrect vapour barrier placement causes rot and structural damage over time. Use mineral wool in the cavity and a single vapour retarder on the warm side only.
-
Moisture building up over time: Check your cabin for signs of condensation on windows or damp patches on walls each autumn. Catching moisture problems early is far cheaper than replacing rotted timber later. For more detail on this, the Logcabinkits guide to moisture control in cabins covers the key warning signs and fixes.
Key takeaways
Effective cabin insulation depends on doing things in the right order: air seal first, then insulate, with vapour control always on the warm side of the assembly.
| Point | Details |
|---|---|
| Air seal before insulating | Sealing gaps first cuts energy costs by 10 to 20% and makes insulation far more effective. |
| Use mineral wool in walls | Mineral wool’s breathability prevents moisture trapping and avoids dual vapour barrier problems. |
| Vapour barrier placement matters | Always place the vapour retarder on the interior (warm) side of the insulation in a UK climate. |
| Cut insulation for a tight fit | Even a small gap reduces effective R-value significantly, so precision cutting is as important as material choice. |
| Ventilate the roof assembly | Counter battens above roof insulation create the air gap needed to prevent condensation and rot. |
Why I always start with air sealing, not insulation thickness
People often ask me whether they should go for thicker insulation boards or a higher-spec vapour barrier. My honest answer is: neither, until you’ve sorted your air sealing. I’ve seen cabins with 100mm of rigid foam in the roof still losing heat at a rate that made the heating bills wince-inducing, simply because the log walls hadn’t been chinked properly and the door frame had a gap you could post a letter through.
Mineral wool is my go-to recommendation for walls in UK cabins, and I’ve stuck with that view after seeing other materials underperform in damp conditions. Rigid foam is excellent for floors and roofs where you need high R-value in a thin profile, but in a wall cavity where moisture movement matters, mineral wool’s breathability gives you a genuine safety margin.
The other thing I’d say is this: don’t try to do everything at once. Floor insulation first, then walls, then roof. Each stage is manageable on its own. Tackling all three in a weekend leads to rushed cuts, gaps, and problems you won’t notice until winter. Take it one layer at a time, check your work before moving on, and the results will be worth it.
The aesthetics question comes up too. External roof insulation keeps your interior ceiling beams on show, which is one of the nicest features of a log cabin. It’s worth the slightly more involved installation to preserve that look. You can find more practical guidance on year-round cabin comfort if you want to go deeper on any of these areas.
— Martin
Ready to insulate? Start with the right cabin
If you’re planning a cabin insulation project, the building itself makes a big difference to how straightforward the job will be. Logcabinkits supplies quality timber garden buildings designed with solid construction that lends itself well to insulation upgrades.

Whether you want a standard garden log cabin or something tailored to your exact dimensions and insulation preferences, Logcabinkits offers bespoke log cabin builds with free UK delivery. The team is happy to discuss cabin configurations that work well with the insulation methods covered in this guide. Browse the full range of garden log cabins and get in touch to talk through your requirements.
FAQ
What is the best insulation material for a log cabin?
Mineral wool is the best all-round choice for cabin walls because it is breathable, fire-resistant, and reduces the risk of moisture trapping. Rigid foam boards such as Kingspan or Celotex are better suited to floors and roofs where a high R-value in a thin profile is needed.
Do I need a vapour barrier in a log cabin?
Yes. A vapour barrier or vapour retarder is needed on the warm side of the insulation assembly to prevent warm moist air from condensing inside the wall or floor build-up. In a UK climate, this means fitting it on the interior face of the insulation.
How do I stop my cabin floor from getting damp?
Install a breathable moisture membrane between the floor joists to block ground dampness, then add a taped vapour barrier on top of the insulation before laying the subfloor. Overlapping seams by at least six inches and sealing with tape creates an airtight layer that protects the insulation.
Can I insulate a log cabin myself?
Yes. Floor, wall, and roof insulation are all achievable DIY tasks with basic tools and careful preparation. The most important steps are sealing air leaks first, cutting insulation for a tight fit, and placing the vapour barrier correctly on the warm side of the assembly.
How much can insulation reduce my cabin heating costs?
Air sealing alone cuts heating and cooling costs by 10 to 20%. Combined with properly fitted floor, wall, and roof insulation, the reduction in energy use makes a noticeable difference to running costs across a full heating season.