
Why cabins need air gaps: your complete guide

TL;DR:
- Air gaps are intentionally designed spaces behind cabin walls and cladding that facilitate moisture drainage, improve insulation, and promote ventilation. Properly sized and continuous air gaps protect timber structures from mould, rot, and moisture-related damage, ensuring long-lasting durability. Careful planning, maintenance, and correct installation of these gaps are essential for energy efficiency and healthy indoor environments.
Air gaps are intentional spaces built into cabin walls, roofing, and cladding that control moisture, improve insulation, and keep the air inside healthy. If you’re planning a garden log cabin build or renovation, understanding why cabins need air gaps is one of the most practical things you can do before you start. Get them right and your cabin stays dry, warm, and structurally sound for decades. Ignore them and you’re looking at mould, rot, and rising energy bills. This guide covers everything you need to know, in plain language.
Why cabins need air gaps: the core reasons
An air gap is simply a designed space between two layers of a building’s structure. In cabin construction, you’ll typically find them behind external cladding, beneath roofing materials, and within wall assemblies. The industry term for the most common application is a ventilated cavity or rainscreen cavity, and it’s worth knowing both terms when you’re talking to builders or suppliers.
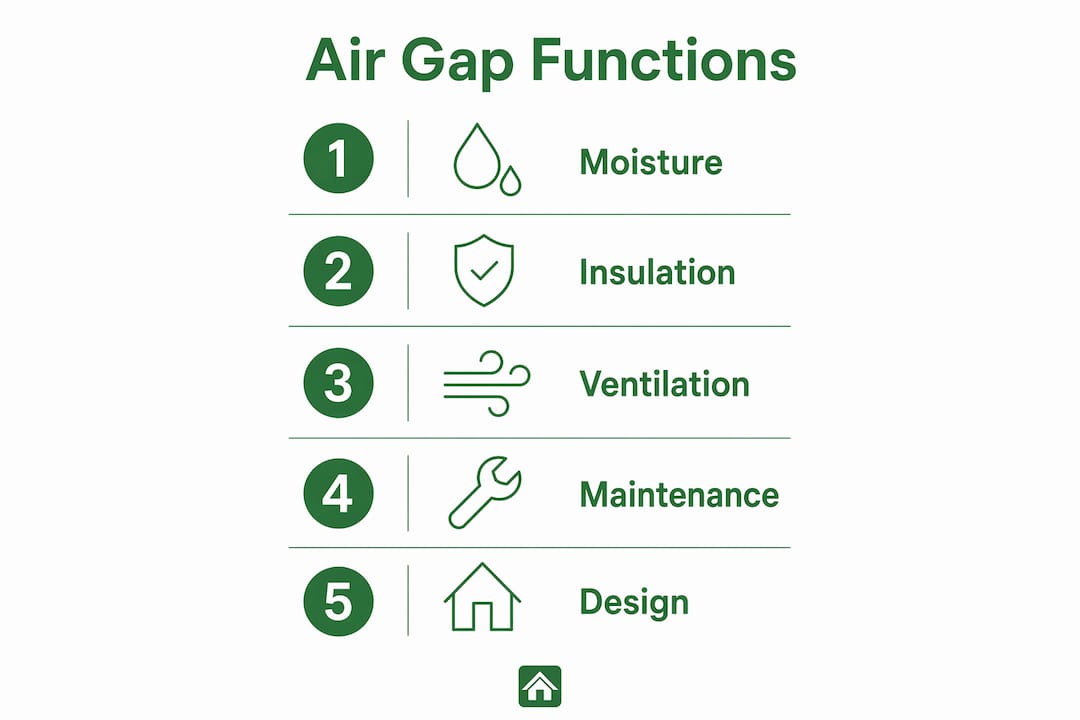
The three jobs an air gap does are moisture control, thermal performance, and ventilation. Each one matters on its own. Together, they determine whether your cabin lasts 10 years or 40 years. Moisture buildup and mould problems affect 50% of homes, and the same risks apply directly to garden cabins. That statistic tells you this isn’t a minor detail. It’s a structural priority.
Named systems like the StoVentec® Rainscreen® system and guidance from organisations like ASHRAE and the U.S. Department of Energy all point to the same conclusion: air gaps are not optional extras. They’re a core part of any well-built timber structure.
How do air gaps prevent moisture buildup in cabins?
Moisture is the single biggest threat to a timber cabin. It enters through rain, condensation, ground humidity, and even the breath of the people using the cabin. Without a way to escape, that moisture gets trapped inside walls where it causes mould, rot, and eventually structural failure.
Air gaps solve this by creating a ventilated channel behind the cladding. This channel allows water vapour to evaporate and any liquid water that gets in to drain away before it reaches the structural timber. This is the principle behind rainscreen assemblies, which work as a two-layer defence: the outer cladding takes the weather, and the air cavity behind it handles the drying and drainage.
Here’s what moisture does when there’s no air gap in place:
- Water vapour condenses on cold surfaces inside the wall
- Trapped moisture soaks into timber, causing swelling and rot
- Mould spores grow in damp cavities, affecting air quality indoors
- Freeze-thaw cycles in winter crack and split saturated timber
- Structural fixings corrode faster when constantly exposed to moisture
“Ventilated-cavity assemblies do not guarantee zero water entry but provide a secondary defence by allowing drying and drainage.” — Building Science Consulting via Wikipedia
The key point here is that you’re not trying to stop every drop of water. You’re giving any water that does get in a way out. That’s a much more realistic and effective approach for a timber cabin in the UK climate.
Pro Tip: Check that your air gap runs continuously from bottom to top behind the cladding. Any blockage, such as a horizontal batten or debris, breaks the airflow and defeats the purpose entirely.
Why are air gaps critical for cabin insulation and energy efficiency?
A common worry is that gaps in a wall must mean heat escaping. In fact, the opposite is true when air gaps are designed correctly. Dead air spaces trapped within small cavities are poor conductors of heat, which is exactly what you want in an insulated wall. Perma-Chink Systems notes this principle in the context of log cabin chink joints, where trapped air adds measurable thermal resistance.
The difference between a beneficial air gap and an unwanted air leak comes down to whether the air is moving. A sealed or slow-moving air pocket resists heat transfer. An uncontrolled gap that lets cold air rush through your wall does the opposite. The goal is to design gaps that ventilate moisture without creating draughts.
| Air gap type | Location | Effect on insulation |
|---|---|---|
| Ventilated cavity | Behind external cladding | Removes moisture, protects insulation layer |
| Dead air space | Within chink joints or wall cavities | Adds thermal resistance, slows heat transfer |
| Uncontrolled leak | Random gaps in wall assembly | Reduces R-value, increases energy use |
| Sub-roof ventilation gap | Between insulation and roof deck | Prevents condensation on roof structure |
According to the U.S. Department of Energy, missed gaps of any size increase energy use and moisture risk, particularly during cooling seasons. For a UK garden cabin, this translates directly to higher heating costs in winter and a damp, uncomfortable interior. Getting the air gap design right from the start is far cheaper than retrofitting insulation or treating mould later.
Pro Tip: Never place an air gap inside your insulation layer. The gap should sit between the insulation and the cladding, not within the insulation itself. A gap inside insulation breaks the thermal barrier and causes heat loss.
You can find more practical guidance on energy-efficient cabin design on the Logcabinkits website, which covers insulation and air gap strategies together.
How do air gaps contribute to proper ventilation in cabins?
Ventilation in a cabin isn’t just about comfort. It’s about health and structural integrity. The ASHRAE Standard 62.2, referenced by the U.S. EPA, recommends a minimum of 0.35 air changes per hour or 15 cubic feet per minute per person to maintain acceptable indoor air quality. For a small, well-sealed cabin, that’s a meaningful target to plan for.
Air gaps in walls and roofs form part of a passive ventilation system that helps meet these rates without mechanical fans. Here’s how a well-designed air gap ventilation system works in a garden cabin:
- Fresh air enters at the base of the ventilated cavity through a protected gap or vent
- Air warms as it rises through the cavity, picking up moisture vapour from the timber
- Warm, moist air exits at the top through ridge vents or open eaves
- This continuous movement keeps the wall assembly dry and the interior air fresher
- Occupants benefit from reduced condensation on windows and walls
The EPA also notes that random leakage gaps do not guarantee the air changes needed for good indoor air quality. Designed air gaps are intentional and consistent. Accidental gaps are unpredictable and often in the wrong places. This distinction matters enormously when you’re planning a cabin you want to use year-round. For more on this topic, the Logcabinkits guide on cabin ventilation and air quality is worth reading alongside this article.
What types of air gaps exist in cabin construction?
Not all air gaps are the same. Different parts of a cabin need different types of ventilated spaces, and each one serves a specific purpose.
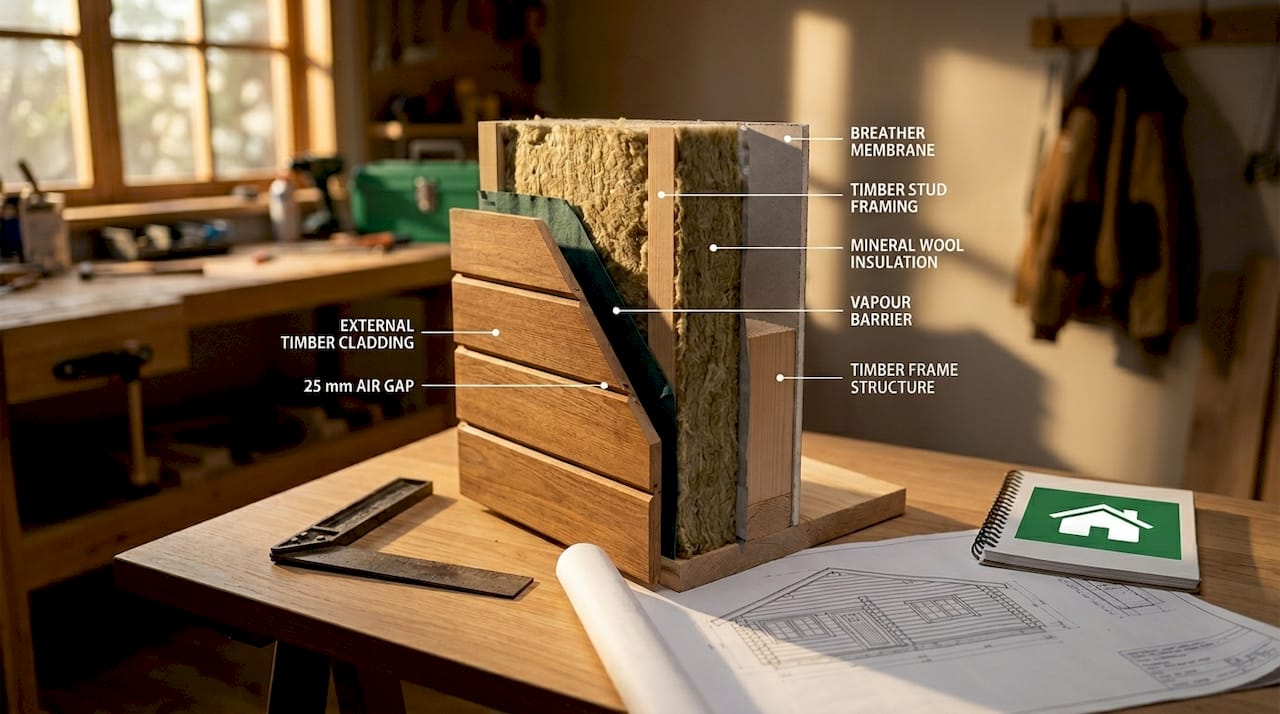
Rainscreen cavities sit behind external cladding boards. They are the most widely discussed type and the one most directly associated with moisture protection. A 25 mm minimum ventilation gap behind cladding is the industry-recommended standard to manage moisture effectively and protect structural elements. Less than 25 mm and airflow becomes restricted. More than 50 mm and the cavity can allow too much air movement, reducing the thermal benefit.
Sub-roof ventilation gaps sit between the insulation layer and the underside of the roof deck. In a garden cabin, this gap prevents condensation from forming on cold roof timbers during winter. Without it, the roof structure can rot from the inside while looking perfectly fine from outside.
Chink joint air spaces are specific to log cabin construction. These small cavities between log courses trap still air, which adds to the wall’s overall thermal resistance. The StoVentec® Rainscreen® system takes this principle further by combining air and water-resistive barriers with continuous insulation and ventilated cladding for high durability in demanding conditions.
Here’s a quick comparison of the main types:
| Type | Location | Recommended size | Primary function |
|---|---|---|---|
| Rainscreen cavity | Behind external cladding | 25 mm minimum | Moisture drainage and evaporation |
| Sub-roof gap | Between insulation and roof deck | 50 mm typical | Condensation prevention |
| Chink joint space | Between log courses | Variable | Thermal resistance |
| Foundation gap | Between floor and ground | 150 mm minimum | Ground moisture protection |
The risks of getting the size wrong are real in both directions. Too small and airflow stalls, trapping moisture. Too large and you lose thermal benefit while potentially allowing pests to nest in the cavity.
How to design and maintain effective air gaps in your cabin
Good air gap design starts at the planning stage, not after the walls go up. Here are the key principles to follow when building or renovating:
- Keep air gaps continuous and unobstructed from bottom to top of the wall
- Use breather membranes behind cladding to allow vapour out while keeping liquid water away from the structure
- Seal vapour barriers on the warm side of insulation, but leave the ventilated cavity open to airflow on the cold side
- Fit insect mesh at the base and top of cavities to keep pests out without blocking airflow
- Check that horizontal battens don’t completely block the cavity. Use vertical counter-battens to maintain the channel
Maintenance is straightforward but easy to overlook. Debris, leaves, and spider webs can block the base of a ventilated cavity over time. A quick visual check once a year, clearing any blockages at the base vent, is all it takes to keep the system working. Logcabinkits has a useful guide on monitoring moisture levels that pairs well with this kind of routine check.
Pro Tip: If you’re renovating an existing cabin, use a moisture meter on the structural timber before you close up any walls. If readings are above 20%, the timber needs to dry out before you seal it in. Trapping damp timber behind new cladding is one of the most common and costly renovation mistakes.
The biggest pitfall in renovation work is confusing a designed ventilation gap with an accidental draught. If you feel cold air coming through a wall, that’s an air leak, not a working air gap. Proper air gaps are in the wall assembly, not through it.
Key takeaways
Air gaps are a non-negotiable part of any well-built garden log cabin, protecting the structure from moisture, improving thermal performance, and supporting healthy ventilation throughout the year.
| Point | Details |
|---|---|
| Moisture protection is the priority | A 25 mm rainscreen cavity behind cladding prevents rot, mould, and structural damage. |
| Dead air improves insulation | Sealed air pockets in wall cavities add thermal resistance without creating draughts. |
| Designed gaps beat accidental ones | Random leakage gaps do not meet ASHRAE ventilation standards. Intentional gaps do. |
| Size and continuity both matter | Gaps under 25 mm restrict airflow; gaps over 50 mm reduce thermal benefit. |
| Maintenance is simple | A yearly check to clear debris from base vents keeps the whole system working. |
Air gaps: what I’ve learned from years of cabin builds
I’ve seen a lot of cabin projects go wrong in the same way. The build looks great from the outside, the timber is good quality, the insulation is thick. But nobody thought carefully about the air gaps, and within two or three winters the problems start showing up. Condensation on the inside of walls. A musty smell that won’t go away. Timber that’s gone soft behind the cladding.
The frustrating thing is that fixing these problems after the fact is expensive and disruptive. Getting the air gaps right in the first place costs almost nothing extra. It’s just a matter of knowing where they go and why.
What I’d tell anyone planning a cabin build is this: treat the air gap as part of the structure, not an afterthought. It’s as important as the insulation or the roof. The cabins that last the longest are the ones where someone thought carefully about how moisture moves through the building and gave it a way out.
I’m also a firm believer that ventilated cladding systems, done properly, are one of the best investments you can make in a timber building. They protect the structural core, they make the insulation work harder, and they keep the interior air quality at a level you’d actually want to spend time in. If you’re looking at a bespoke cabin design, make sure air gap provision is part of the conversation from day one.
— Martin
Build your cabin right with Logcabinkits
If you’re planning a garden log cabin and want to make sure air gaps, ventilation, and moisture control are built in from the start, Logcabinkits can help. The team specialises in bespoke and custom builds where every detail, including wall assembly and ventilation design, is considered as part of the overall structure.

Whether you’re starting from scratch or adapting an existing design, the range of garden log cabins at Logcabinkits includes options built with quality timber and proper construction principles. If you want something tailored to your space and requirements, the bespoke cabin design service is the place to start. Get in touch for a no-pressure conversation about what works best for your garden.
FAQ
What is an air gap in a cabin wall?
An air gap is an intentional space built into a cabin’s wall or roof assembly, typically between the cladding and the structural timber. Its purpose is to allow moisture to drain and evaporate, improve thermal resistance, and support ventilation.
How big should the air gap be behind cabin cladding?
A minimum of 25 mm is the industry-recommended size for a ventilated cavity behind external cladding. This gap is large enough to allow airflow and drainage while maintaining thermal performance.
Do air gaps make a cabin colder?
No. Properly designed air gaps sit outside the insulation layer and do not reduce warmth. Dead air spaces within wall cavities actually add thermal resistance, as noted by Perma-Chink Systems in their research on log cabin thermal efficiency.
Can I add air gaps to an existing cabin?
Yes, though it requires re-cladding the exterior. Before closing up any walls, use a moisture meter to check timber readings. Timber above 20% moisture content needs to dry out fully before new cladding goes on.
What happens if a cabin has no air gaps?
Without air gaps, moisture becomes trapped in the wall structure, leading to mould growth, timber rot, and reduced insulation performance. Building Science Consulting links poor moisture management to significant health risks and repair costs.